Saturday, October 14, 2006

5th Conversion Workshop

95 Probe EV Conversion Workshop #5 10/14/06

We stripped the ’84 Bronco II, removing all the batteries and battery boxes. The boxes are well made from ¼” aluminum and may come in handy.
I was thinking of making a range extending trailer with all the batteries from the Bronco…. We’ll see….

Boy the floor of the Bronco has a lot of holes in it.. no wonder the floor heaved all over the place when driving….


We cleaned up the damaged motor shaft and installed the coupling. Oops, the coupling will not work without modification.

Here is what the coupling looks like:

Here is what it should look like:

Spun up the motor on the bench, the rear bearing sounds bad so we need to replace it. I suspect some surface rust on the bearing like the auxiliary rear shaft (shaft cleaned up OK).Listen to this sound byte.

See you Saturday!!
Rick

Friday, October 6, 2006

Conversion Workshop #5 Sat 10/7 9:00am-??

Recent progress on the 96 Ford Probe Conversion:
- John Wayland had a transmission adaptor plate, spacer ring, and motor coupling from a 1990 Mazda rear wheel drive pickup which looks like it will work on the 95 Probe front wheel drive Mazda transmission. Score!!
- I was looking for a 9" Advanced DC motor for the Probe, and bought a 1984 Ford Bronco II conversion with the motor I need in it (along with quite a few other valuable components) Score!!

Here is a photo of the Bronco II engine compartment:

Here is a breakdown of the parts in the Bronco II (prices from 2006 KTA catalog, looks almost like kit #5 $6400 plus batteries/boxes):
- Motor Advanced DC FB1-4001-A $1560
- motor clamp $150
- transmission adaptor plates $775
- Speed controller DCP Raptor 600 (price from cloudev) $1600
- DCP 350W DC-DC converter (guessing at price) $400
- Albright SW-20B main contactor $130
- big circuit breaker $175
- voltmeter $48
- ammeter $48
- ammeter shunt $22.50
- Bycan 120-144VDC 120/240VAC 12.5/25A charger $1245
- complete vacuum system $385
- 18 good 6v deep cycle flooded batteries and 2 bad ones (estimated price new) $1000
- 7 various battery boxes built from 1/4" aluminum (estimated price) $800

Is someone is interested in buying the Bronco complete for $3500? Going once, going twice.... If not I will tear it apart. It is not a good EV and should not be on the road.

Rick Barnes
Aloha, OR

Thursday, September 28, 2006

Conversion Workshop Session #4 Sat 9/30 9:00-???


Here is a photo of my workbench.

The treadmill motor was cheap, and it will operate the power steering pump and the air conditioning compressor. I will need a controller because the motor is 130VDC and my battery pack will be 144-156V. I also do not want to run the motor at full 6000 rpm, probably around 4500 rpm would be better.

The vacuum pump was cheap too, and pretty neat. It is a rotary vane so it does not vibrate like the piston pumps. It is pretty quiet too, running about 3 amps or less on 12-30V. It has a brushless DC motor. I took it apart and replaced the hall sensors and she purrs like a kitten.

I have a pretty cool vacuum pressure controller coming in the mail from eBay: ZSE5B-02-27L http://www.smcetech.com/CC_catalogs/smc/pdf/ISE5B.pdf

Work plan:
- remove engine (really may happen this time!!)

I bought a strut spring compressor which should help disjoint the axles.
I found a manual showing the removal of the axles (needs to be done before the engine can come out).

Hey the Probe needs brakes! We can do a future workshop on just brakes. Disc brakes. Front and/or rear. Any interest let me know. Disc brakes are easy, don't let Les Schwab take your money! Bring your car over and we can do yours too.

Rick Barnes
Aloha, OR

Saturday, September 16, 2006

3rd Conversion Workshop

REMOVAL & INSTALLATION
See Figures 1 through 12
1. Raise and safely support the vehicle. Remove the wheel and tire assemblies.
Fig. 1: Exploded view of the halfshaft assemblies and related components


2. Remove the splash shield, if equipped, and drain the transaxle.
3. Raise the staked portion of the hub locknut with a hammer and chisel. Lock the hub by applying the brakes and remove the nut.
Fig. 2: To remove the halfshaft, first raise and support the vehicle. Remove the wheel, then raise the staked portion of the hub locknut
Fig. 3: Have an assistant apply the brakes and loosen the hub locknut ...

This is where I broke my nice Craftsman torque wrench by standing on it.
Fig. 4: ... then remove and discard it. Always install a new hub locking nut when installing the halfshaft
Fig. 5: Loosen the stabilizer bar end link-to-control arm retaining nut ...
Right, the nut just spins. Need to hold stud with allen wrench and use 12mm open end wrench. But rusted on, so we had to air chisel off the nuts.
Fig. 6: ... and disengage the link from the control arm bracket
4. Disconnect the stabilizer bar from the lower control arm.
5. Remove the cotter pin and nut from the tie rod end ball stud. Use a suitable tool to separate the tie rod end from the knuckle.
6. On 1571-76 420/MX-4/Probe and Millenia, remove the transverse member.
Fig. 7: Remove the lower ball joint pinch bolt and nut ...
Fig. 8: ... and disengage the ball joint from the steering knuckle. Some careful prying may be necessary, but use care near the dust boot

Careful and not-so-careful prying would not get it off. It is loose though. I bought a spring compressor for the strut springs, maybe this will help get it apart.
This is where the work will begin Saturday! Rick
Fig. 9: Pull outward on the knuckle assembly and withdraw the splined axleshaft from the wheel hub
7. Remove the lower ball joint pinch bolt and nut. Use a prybar to pry down the lower control arm and separate the ball joint from the knuckle.
8. If removing the left side shaft on MX-1 and 1571-76 420/MX-4/Probe and Millenia with automatic transaxle, proceed as follows:
Fig. 10: If the axleshaft end seems stuck in the wheel hub, gently tap it with a soft faced hammer to break it loose


Fig. 11: With the outer end of the halfshaft free, use a prybar and remove the inner end from the transaxle case ...


Fig. 12: ... then remove the entire axleshaft from the vehicle

Saturday, September 9, 2006

2nd Conversion Workshop

Larry helped strip the interior, remove the muffler shields, gas lines, intake, etc. Larry has an electric Rabbit he needs many components for. I traded him a cool art deco clock for some of the old Sprint parts (DC/DC converter, "Bad Boy" Bohn charger, 10 tired flooded Marine'/RV batteries). He still needs a contactor, battery disconnect, fuse, controller, wiring, battery boxes, etc.My friend Jeff came over and helped make the hole for the main battery box. He brought a nice Dewalt metal shear but the air chisel with cutter tip worked the best.


Wednesday, September 6, 2006

Conversion Workshop Session #2 Sat 9/9/06 9am=??

Project:
1995 Ford Probe EV Conversion

Current Status:
Car up on blocks ready for engine removal. Exhaust system, hood, radiator, fan, fuel tank, rear seat bottom, all removed.

This weeks work plan Saturday 9/9/06 9am-??
1. remove the engine
2. remove unneeded exhaust shielding and fuel lines under the car
3. remove front seats, rear seat backs, carpeting
4. cut opening for main battery box to fit (9-10) group 31 in the space formerly occupied by the rear seat/fuel tank. Note 3-4 additional batteries will be located elsewhere location TBD, likely under the hood. Does anyone have a pneumatic or electric metal shear???

ToDo List:
- need to weld flange back on the fuel filler pipe (someone have a welder which will handle thin steel?). The pipe was cut down for re-installation because it has all the brackets needed to mount the plastic shield inside the wheel well. This short piece of pipe can be used as a conduit for the charger cord.
- shop manual (in transit from eBay, will be here before Saturday)
- vacuum pump (in transit from eBay)
- research how many horsepower is required to run the power steering pump.

If you are interested in participating (no experience needed), let me know in an email and I will send you my contact information.

Rick Barnes
Aloha, OR

Saturday, September 2, 2006

1st Conversion Workshop

How this all started:
I have been thinking about building another electric car for a while. While garage sale-ing with my wife Rejeanna, we found a decent looking car with a blown engine. They were asking $500 but the daughter was not home with the keys to give it a closer look. Several weeks went by and the more I thought about it the more I thought the Probe would mave a great electric conversion. I went back over to the house and the car was still there. I was able to negotiate down to $350 (less than the cost of the 4 brand new tires on the car).

1995 Ford Probe
EV Conversion Workshop #1

9/2/2006
Dan Shoop and Larry Sipe helped to move the car. I borrowed a trailer from a friend at work. It took us about an hour to load the car onto the trailer. We were missing the rod used to secure one of the ramps. Dan and Larry came up with a brilliant idea to use the jack handle from my truck. Worked great!!
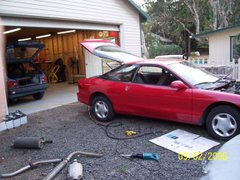
When we got the car home, we removed the hood, radiator, fan, exhaust system, and started freeing the engine for removal.

“Treasure” found under the rear seat:
This was obviously a chick's car! I found almost $10 in change lodged in every crevice and oriface!


View from the Front:
Charging the car battery (it was completely dead) to check fuel level.


The Garage:
This is going to be the new home for the Probe for a while.... You can see a little bit of the crappy Chevy Sprint EV on the left side of the photo.


Side View:
The exhaust system has been surgically removed, and is strewn all labout. At first I thought it would be nice to remove it in one or 2 pieces, so maybe someone with a gas powered Probe could re-use it. Too much trouble, the air chisel and cutoff saw got the job over with.

Friday, September 1, 2006

Conversion Workshop Saturdays

EV Folks:

My garage is open to all most Saturdays until the 1995 Ford Probe EV conversion is complete. Feel free to stop by and look, or better yet help out and get greasy (no experience required).

Sat 9/2 9am work plan:
- I have borrowed a trailer from a friend, need to remember to take chains, come-a-long, etc to winch the Probe onto the trailer and tie it down.
- the car is located 2 miles away, need to give the ladies $350 cash, get the paperwork squared away, and load up the car. The car does not run so it will be a chore to get it onto the trailer.
- unload Probe, drain gas tank into F250 truck, drain anti-freeze
- power wash engine and underneath if needed
- remove fuel tank, exhaust, rear seat, hood, prepare engine for removal
- stand around and drink beer

If you are interested, I can send you my contact info.

Here is a weblog I found detailing a Ford Probe conversion (car is a few years older than mine): http://www.evconvert.com/eve/

Here is a file photo (1995 GT pictured, I think mine is an SE)


Rick Barnes
Aloha, OR

Sunday, August 27, 2006

EV Probe Conversion Workshop

I am going to host an electric vehicle conversion workshop series in my garage. Anyone interested? No experience required.

On Saturday I will be picking up my new "glider". It is a 1995 Ford Probe with a blown engine (piston rod sticking through the engine block, she was driving without oil), found at a yard sale. This car has 93K miles. New tires, new brakes. 5-speed manual transmission. Manual windows. A/C. Hatchback. Great space for a battery box (rear seat sits atop very large square fuel tank). Fair-Good condition: here are the issues noted: 2nd owner, fairly high quality repaint (red now, was a more purpley red), from New York (no visible corrosion, brake drums look a little rusty though), dead battery, missing rear trim section of center console, cracked and taped lr taillight, impact scuff on left side (rubbing compound will erase most of it). Asking price $500 Purchase price $350. I described what I had planned for the car, and showed her my 86 Chevy Sprint conversion. Actually this Probe is a pretty decent car, suppose the engine problem turns out to be some simple fix like a broken timing belt. Will I struggle with the thought of fixing it and turning a profit?

Session 1: Sat 9/2/06 9:00am-12. Does anyone have a car trailer for rent (I have a truck)? Can someone help Saturday to relocate the glider to my garage? It is about a 2 mile move and should not take long. We can even start taking things apart! I hope there is a full tank of gas in it!

Future Sessions:
I would like to transfer and re-use as many of the EV components as possible from the '86 Chevy Sprint, yet keep it drivable until the last possible instant. Hopefully the Prestolite MAV4002 motor can be used. It would need a coupling, transmission adapter, and motor mounts. I heard the transmission is the same as a Mazda 626? Need to confirm this....

Rick Barnes
Aloha, OR